> ## Documentation Index
> Fetch the complete documentation index at: https://docs.levelblue.com/llms.txt
> Use this file to discover all available pages before exploring further.
# Redeploying an Azure Sensor Using the Same IP
> Step-by-step instructions for redeploying a USM Anywhere Sensor in Microsoft Azure while conserving the same public and private IP addresses.
| **Role Availability** | Read-Only | Investigator | Analyst | **Manager** |
| --------------------- | --------- | ------------ | ------- | ----------- |
Use this procedure to redeploy your **USM Anywhere Sensor** in Microsoft Azure while retaining the same public and private IP addresses.
This process ensures that your existing integrations and data sources continue working without requiring IP changes.
## Step 1. Identify the Sensor in the USM Anywhere UI
1. Log in to the **USM Anywhere** console.
2. Go to **Data Sources > Sensors**.
3. Identify the sensor you want to redeploy.
 4. Record its **public** and **private IP addresses** for later use.
## Step 2. Gather Backup Information from the Sensor CLI
1. Connect to the **sensor console** using SSH or Azure Serial Console.
2. From the **Maintenance** menu, select **Get Backup Information** and press **Enter**.
4. Record its **public** and **private IP addresses** for later use.
## Step 2. Gather Backup Information from the Sensor CLI
1. Connect to the **sensor console** using SSH or Azure Serial Console.
2. From the **Maintenance** menu, select **Get Backup Information** and press **Enter**.
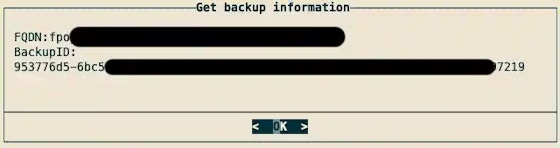
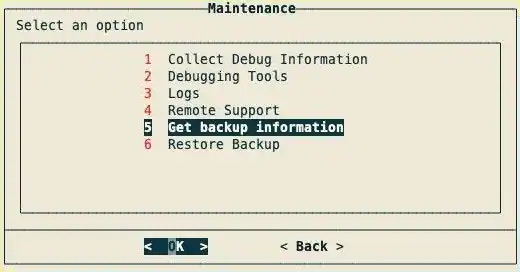 3. Copy the **FQDN** and **BackupID**, and save them for later use.
 ## Step 3. Delete the Existing Sensor VM While Preserve Networking Resources
1. In the **Azure Portal**, open the existing sensor **Virtual Machine**.
## Step 3. Delete the Existing Sensor VM While Preserve Networking Resources
1. In the **Azure Portal**, open the existing sensor **Virtual Machine**.
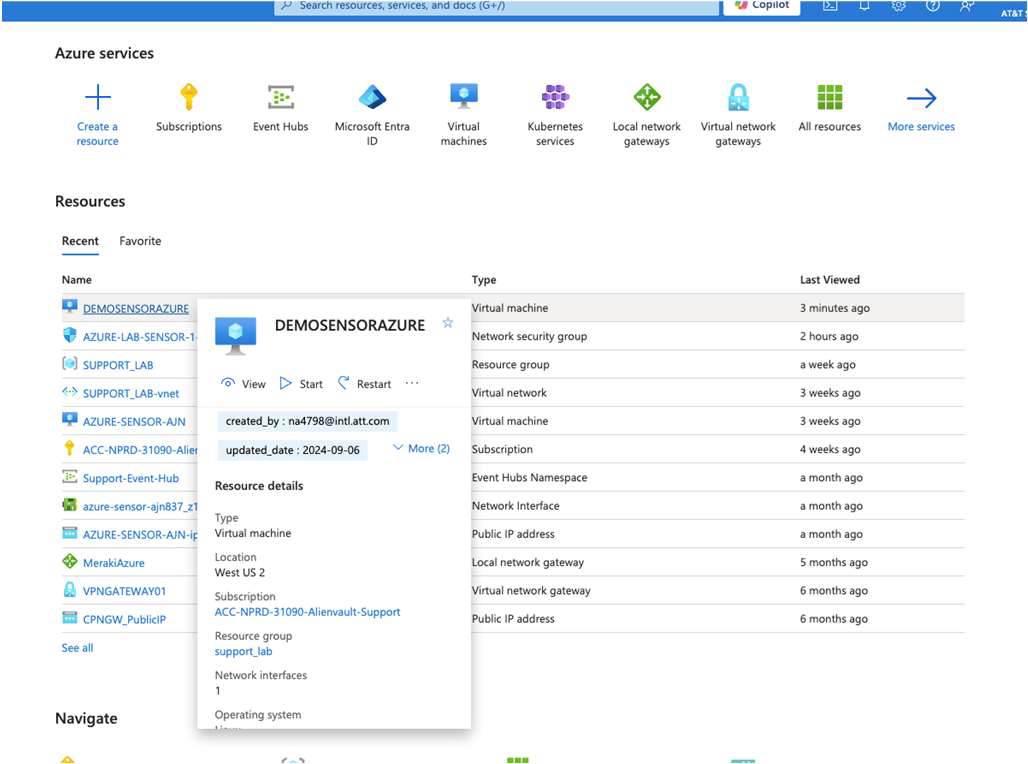 2. Note the following configuration details:
* **Resource group**
* **Virtual network/Subnet**
* **Network Security Group (NSG)**
* **Network Interface (NIC)**
* **Public IP Address**
2. Note the following configuration details:
* **Resource group**
* **Virtual network/Subnet**
* **Network Security Group (NSG)**
* **Network Interface (NIC)**
* **Public IP Address**
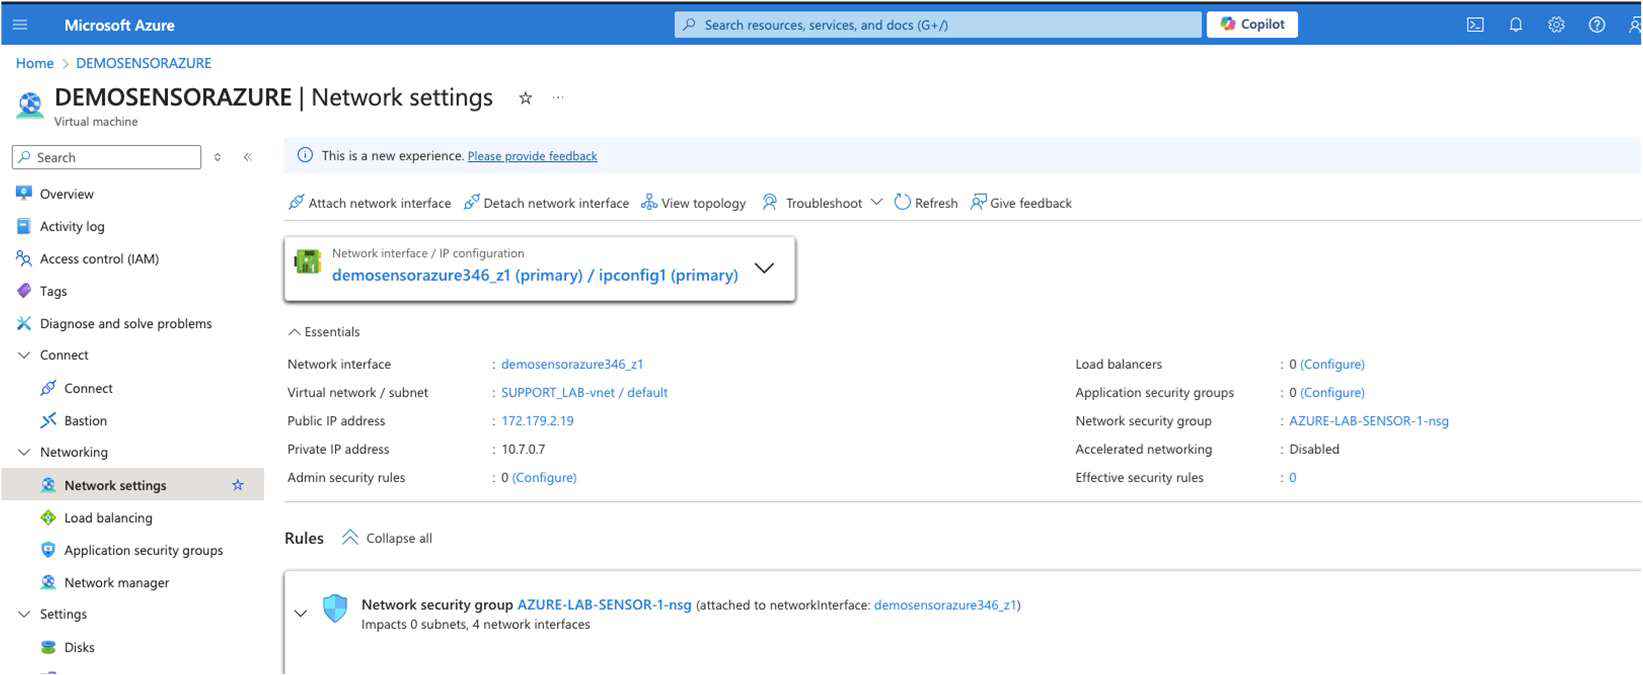 3. Delete the **VM** and its **OS/Data disks**, but **do not delete**:
* The **Network Interface (NIC)**
* The **Public IP Address** resource
3. Delete the **VM** and its **OS/Data disks**, but **do not delete**:
* The **Network Interface (NIC)**
* The **Public IP Address** resource
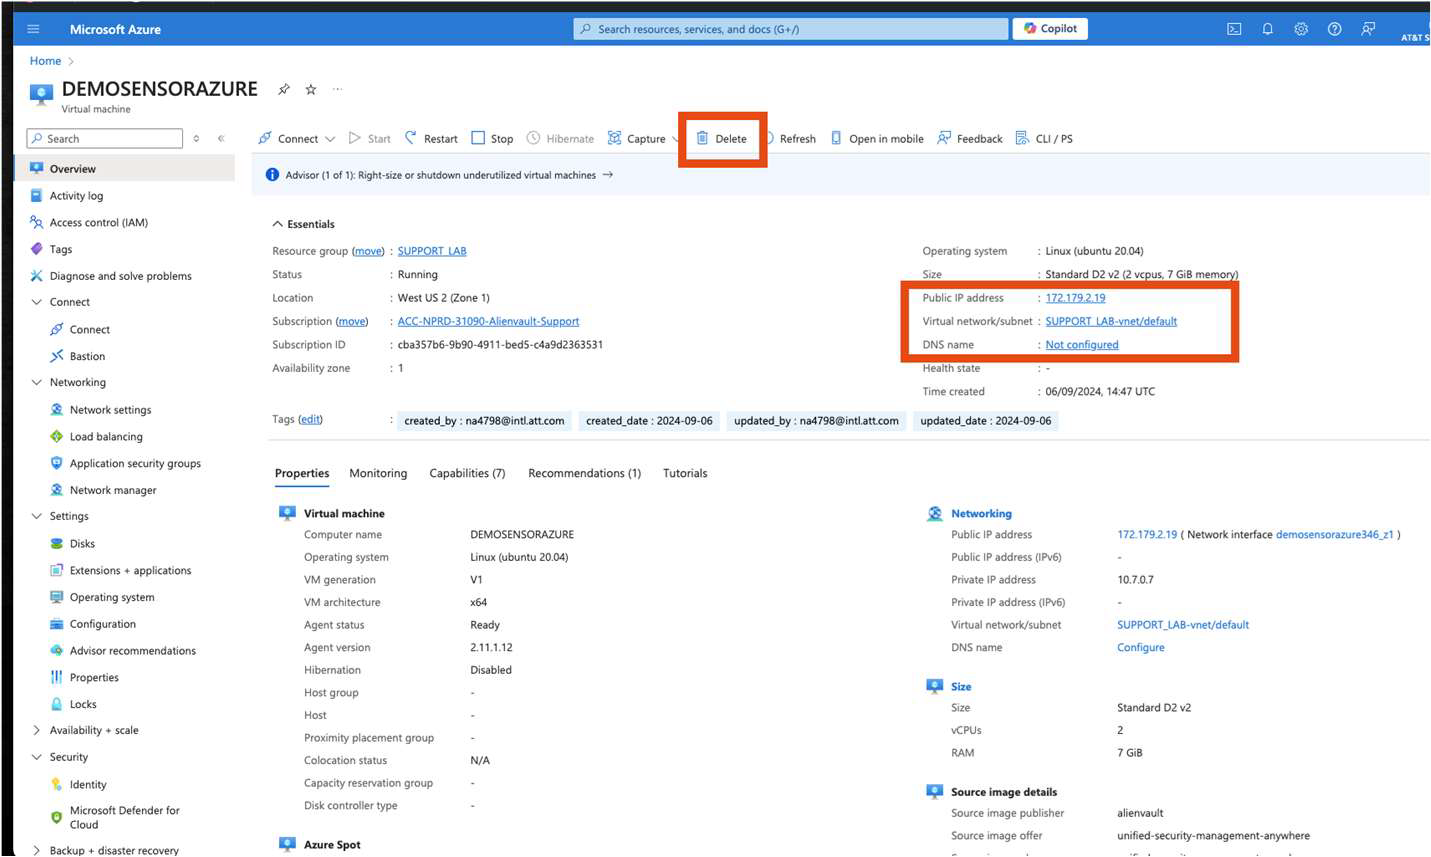
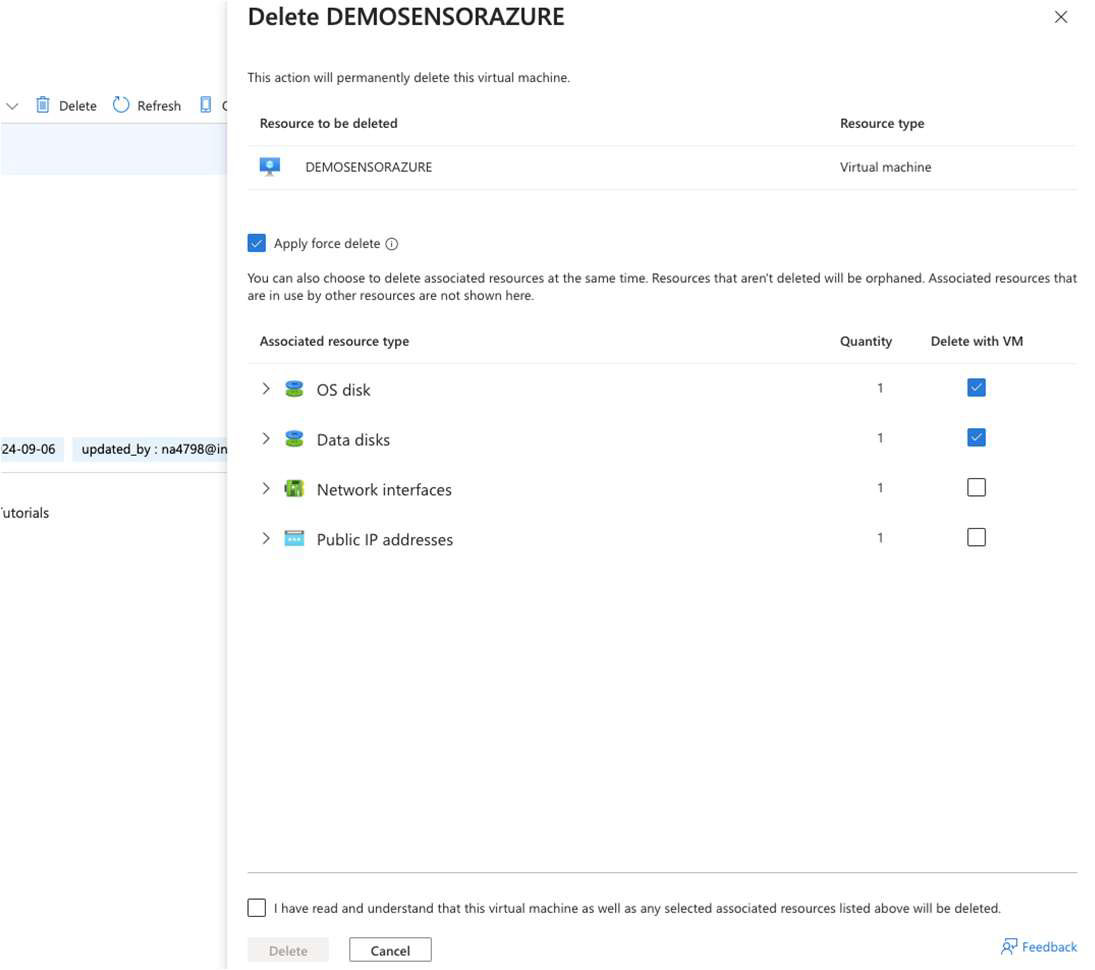 At this point, the sensor will appear as **Connection Lost** in the USM Anywhere UI. This is expected behavior.
 ## Step 4. Deploy a New Azure Sensor VM
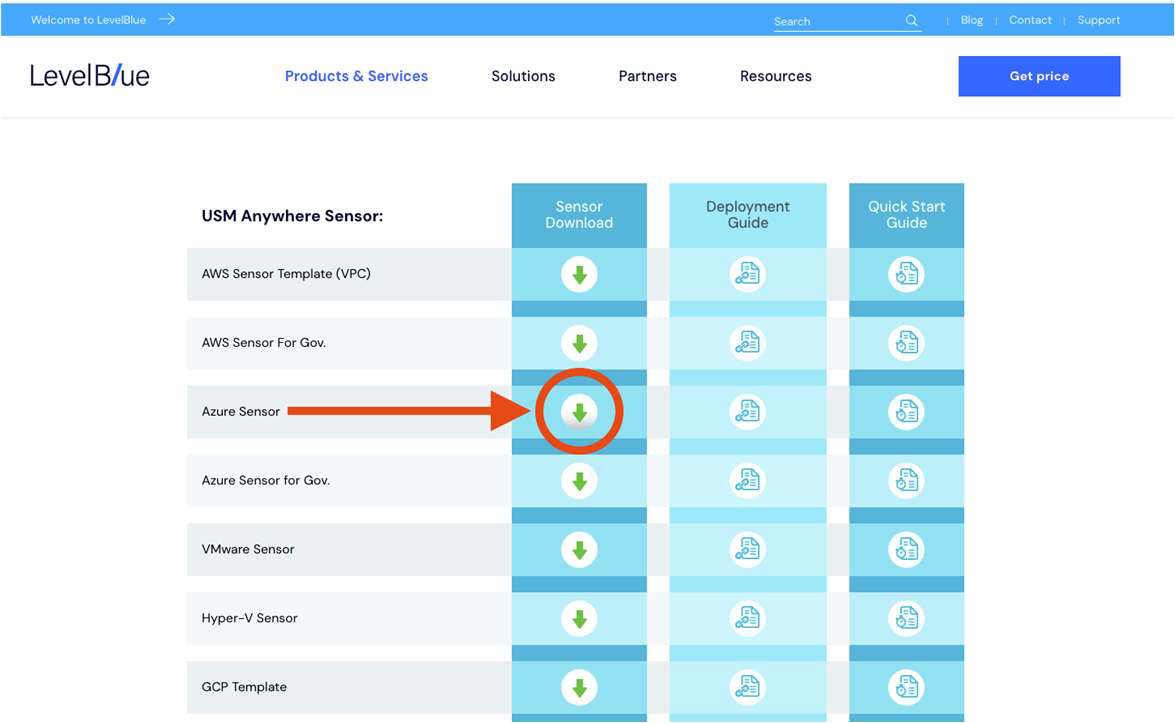
1. Go to the [USM Anywhere Sensor Downloads](https://www.levelblue.com/products/usm-anywhere/sensor-downloads) page and select the download link of the Azure Sensor.
## Step 4. Deploy a New Azure Sensor VM
1. Go to the [USM Anywhere Sensor Downloads](https://www.levelblue.com/products/usm-anywhere/sensor-downloads) page and select the download link of the Azure Sensor.
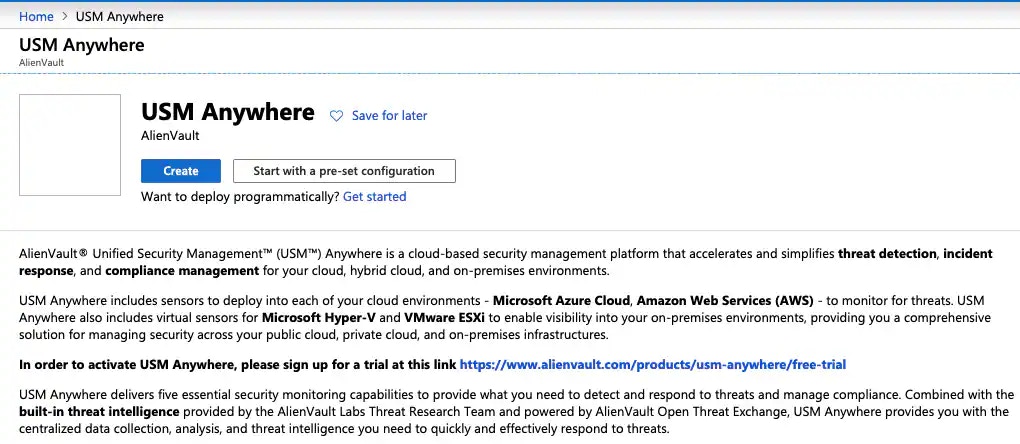
 2. On the page, review the details of the license and click **Create**.
This takes you to the Create a virtual machine page, which guides you through the steps for deploying the USM Anywhere Sensor VM.
2. On the page, review the details of the license and click **Create**.
This takes you to the Create a virtual machine page, which guides you through the steps for deploying the USM Anywhere Sensor VM.
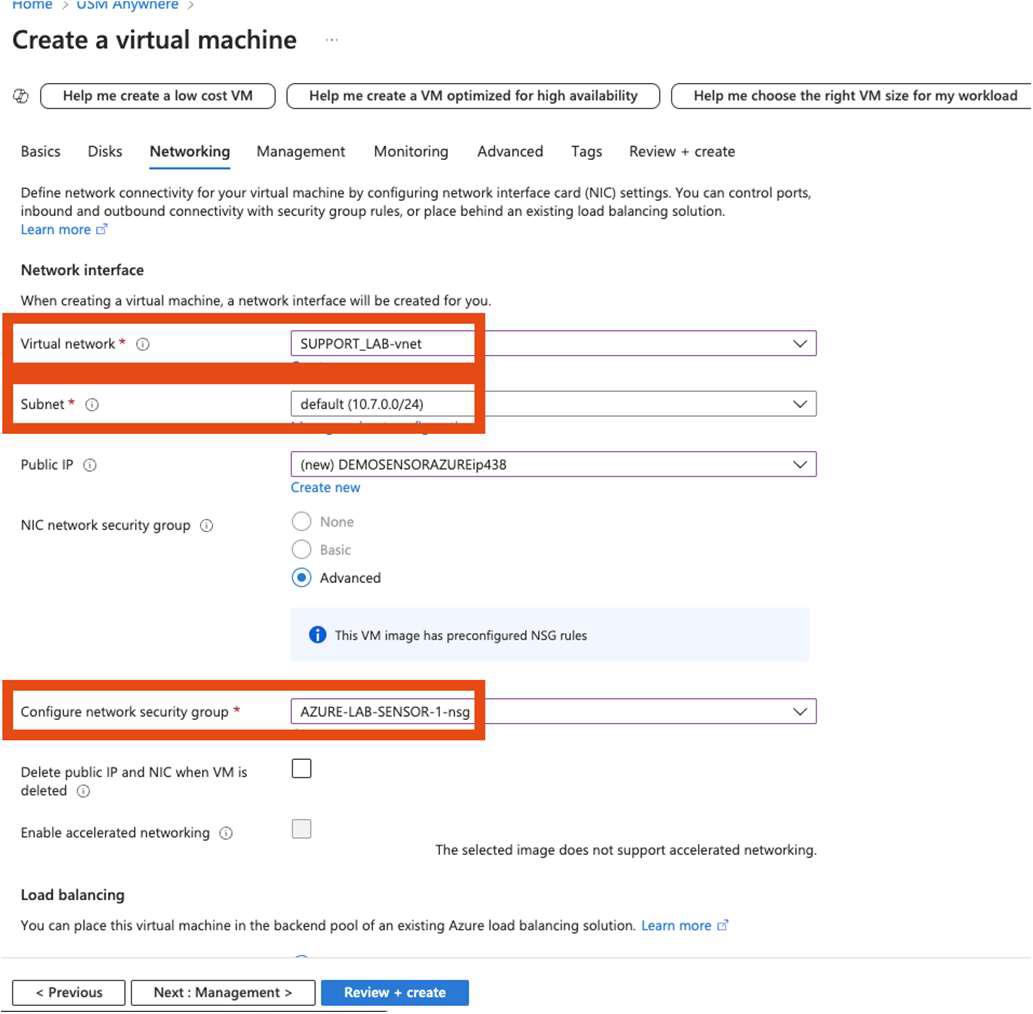
 3. During configuration:
* Assign the **same Virtual Network** and **Subnet** as the original sensor.
* Reuse the **same Security Group** settings.
3. During configuration:
* Assign the **same Virtual Network** and **Subnet** as the original sensor.
* Reuse the **same Security Group** settings.
 **Important:** LevelBlue recommends using sysadmin as the username. If you use a different name, you will need to "sudo up" to access the sensor console. See [Checking Connectivity to the Remote Server](../admin/remote-support-connectivity) for more information.
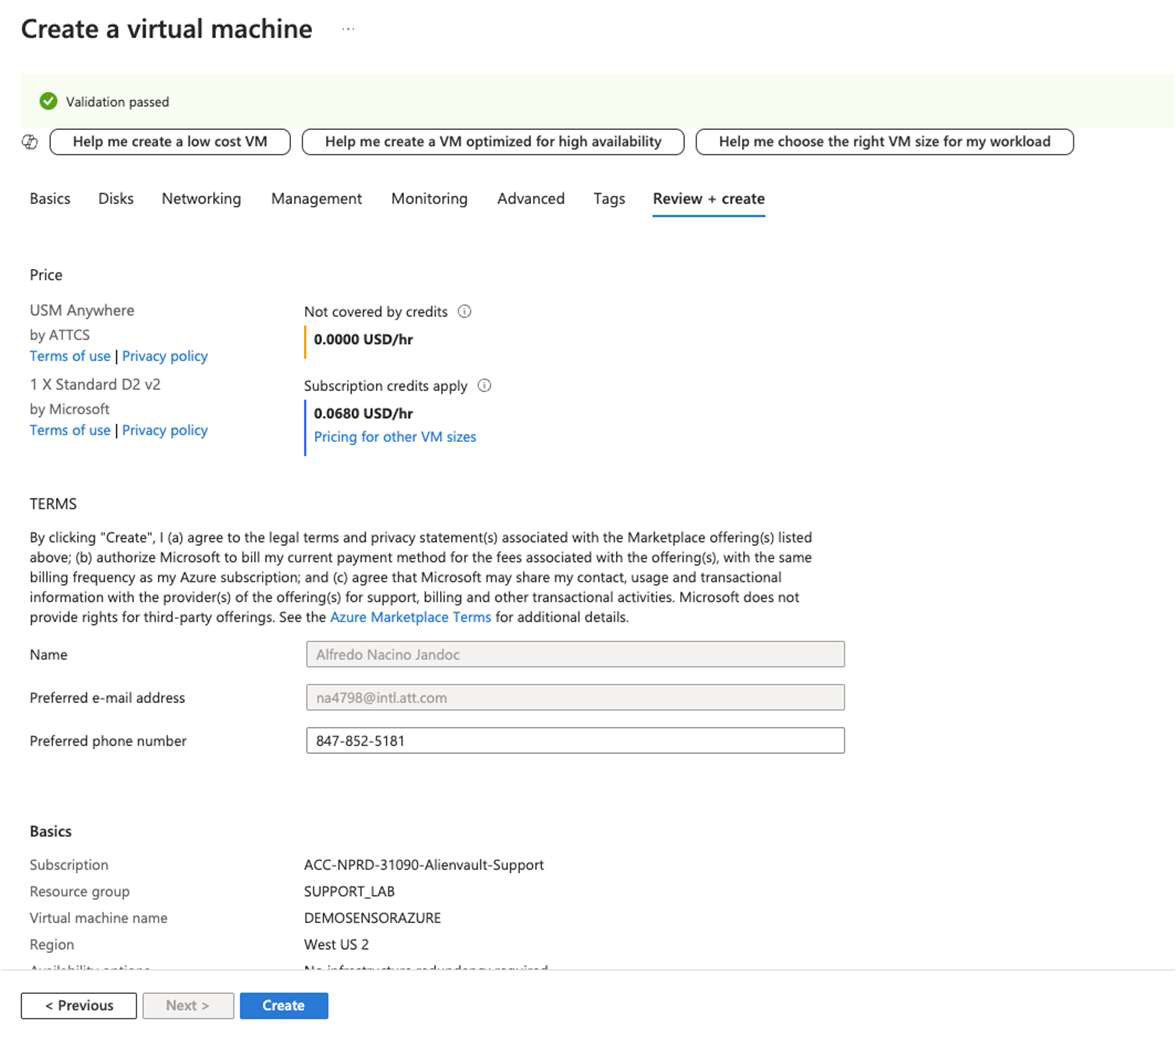
4. Complete the creation by selecting **Create**.
**Important:** LevelBlue recommends using sysadmin as the username. If you use a different name, you will need to "sudo up" to access the sensor console. See [Checking Connectivity to the Remote Server](../admin/remote-support-connectivity) for more information.
4. Complete the creation by selecting **Create**.
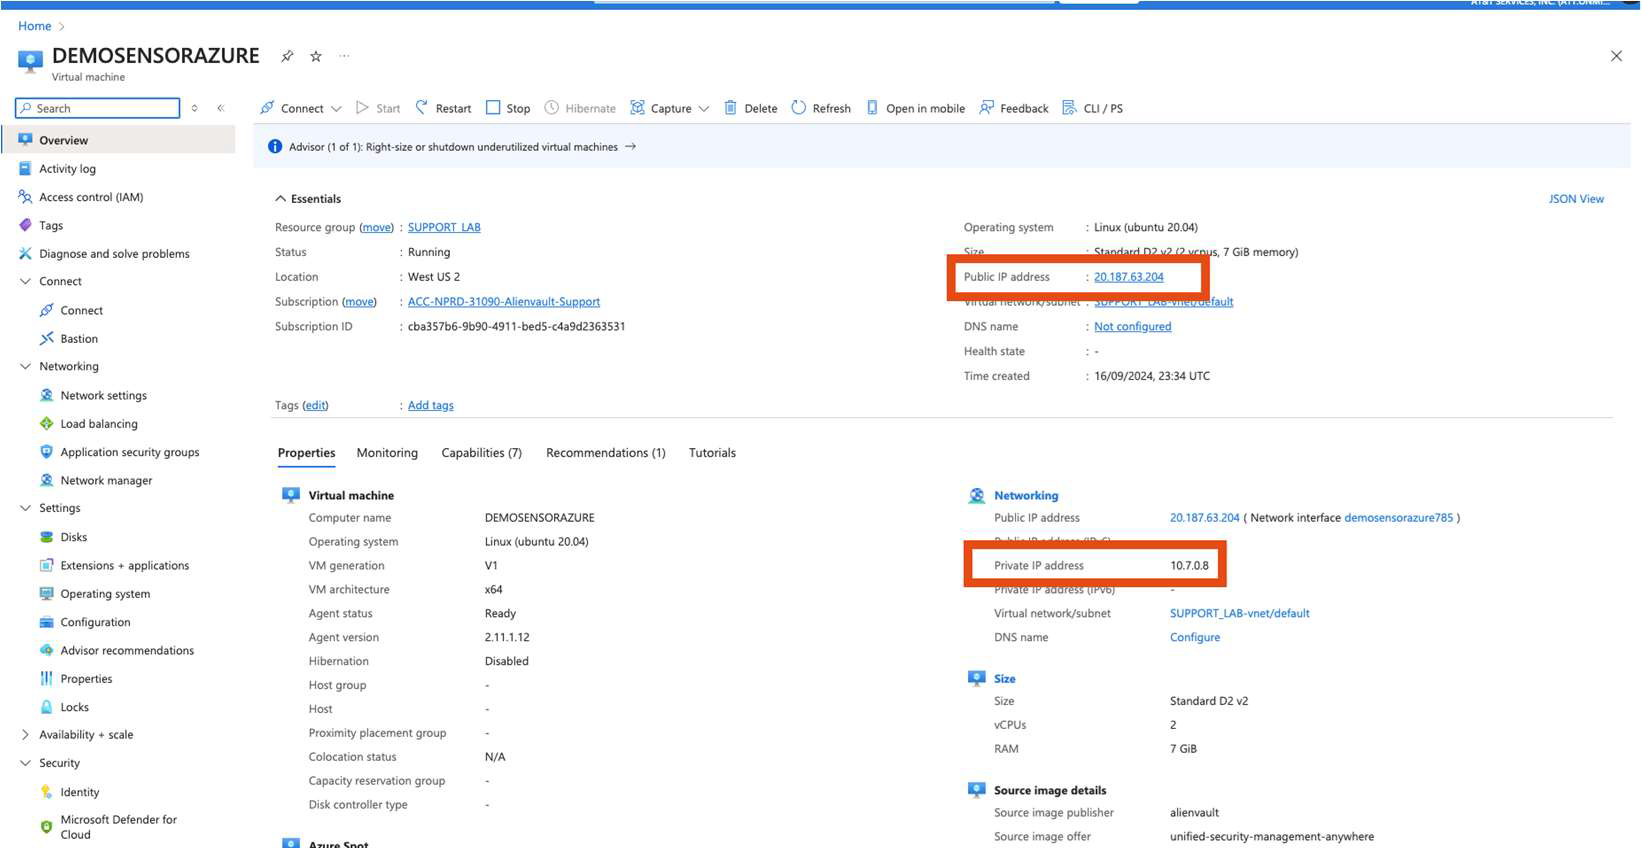
 The new sensor will deploy with a **different temporary IP address**.
 ## Step 5. Stop the New Sensor VM and Swap the Network Interface
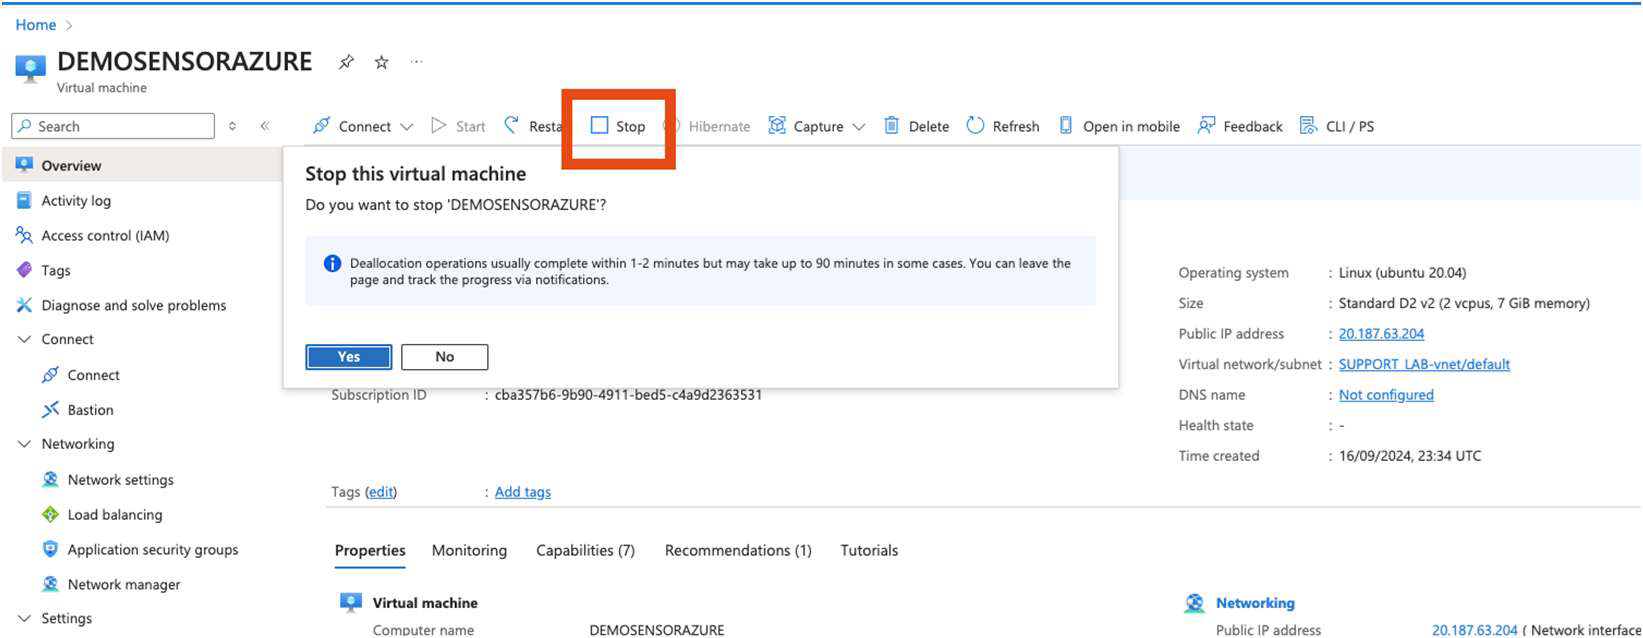
1. In the **Azure Portal**, go to the new sensor VM and select **Stop** to deallocate it.
## Step 5. Stop the New Sensor VM and Swap the Network Interface
1. In the **Azure Portal**, go to the new sensor VM and select **Stop** to deallocate it.
 2. From the resource list, **select** the **original NIC** that retains the old IP address.
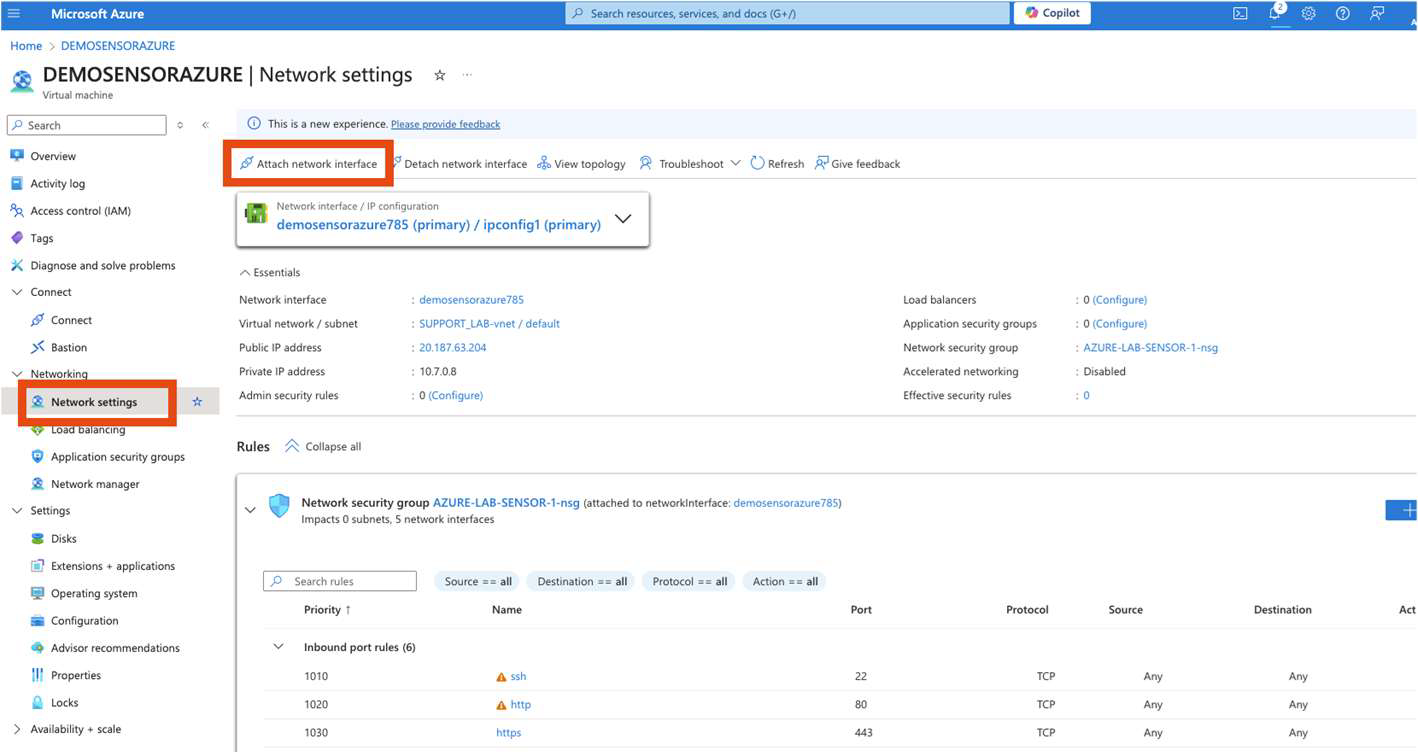 3. Attach this **preserved NIC** to the new VM as **Primary**.
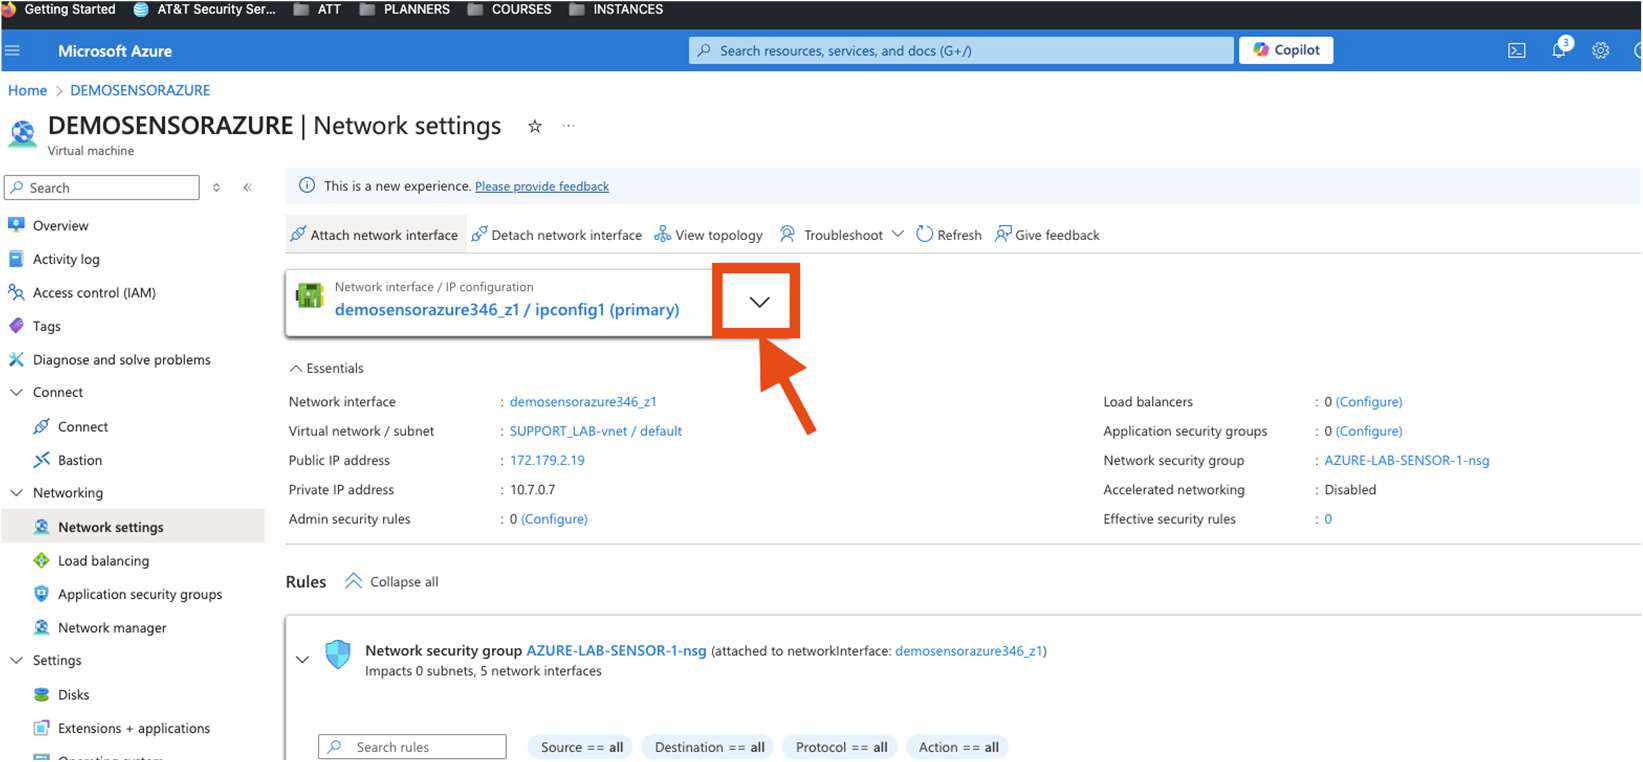 4. Open the **Networking** blade for the new VM and **detach** its temporary NIC.
5. Start the VM again.
If the VM fails to start due to NIC conflicts, ensure the old NIC is detached from any previous VM and retry.
## Step 6. Restore Sensor Backup
1. Open your virtualization management console and connect to the USM Anywhere Sensor virtual machine (VM).
**Important:** Alternatively, you can open an SSH session to the sensor VM. When using an SSH session, the default username is *sysadmin*.
If you are accessing a USM Sensor through SSH and you specified a username other than the default (*sysadmin*) for your SSH access, you must use the following commands at the command line to "sudo up" and access the sensor console:
```
# sudo su – sysadmin
```
2. From the USM Anywhere Sensor console System Menu, select **Maintenance** and press **Enter**.
4. Open the **Networking** blade for the new VM and **detach** its temporary NIC.
5. Start the VM again.
If the VM fails to start due to NIC conflicts, ensure the old NIC is detached from any previous VM and retry.
## Step 6. Restore Sensor Backup
1. Open your virtualization management console and connect to the USM Anywhere Sensor virtual machine (VM).
**Important:** Alternatively, you can open an SSH session to the sensor VM. When using an SSH session, the default username is *sysadmin*.
If you are accessing a USM Sensor through SSH and you specified a username other than the default (*sysadmin*) for your SSH access, you must use the following commands at the command line to "sudo up" and access the sensor console:
```
# sudo su – sysadmin
```
2. From the USM Anywhere Sensor console System Menu, select **Maintenance** and press **Enter**.
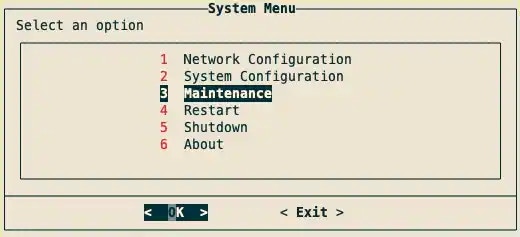 3. From the Maintenance menu, select **Restore Backup** and press **Enter**.
 4. Enter the FQDN and press **Enter**
5. Enter BackupID and press **Enter**. A progress bar will appear. Once it has completed, a dialog box confirming changes have been applied will appear.
4. Enter the FQDN and press **Enter**
5. Enter BackupID and press **Enter**. A progress bar will appear. Once it has completed, a dialog box confirming changes have been applied will appear.
 6. Press **Enter**. Your sensor will now be restored.
## Step 7. Verify Connectivity and Log Ingestion
1. In **USM Anywhere**, confirm the redeployed sensor shows **Connected** status.
2. Check that events and alarms are appearing normally.
3. Verify that the sensor is forwarding logs and communicating with BlueApps and integrations as expected.
## Troubleshooting
| Issue | Cause | Resolution |
| -------------------------------------- | -------------------------------------------- | -------------------------------------------------------------------- |
| **NIC cannot be detached or attached** | VM is still running or allocated | Stop and deallocate the VM before swapping NICs |
| **IP changed unexpectedly** | NIC IP allocation is set to Dynamic | Edit the NIC IP configuration and set it to Static |
| **No data ingestion after restore** | Firewall or NSG rules blocking communication | Check port 443 outbound and confirm required endpoints are reachable |
## Related Topics
* [Redeploying a Sensor](/documentation/usm-anywhere/deployment-guide/admin/redeploy-sensor)
* [Data Sources and Log Collection](/documentation/usm-anywhere/deployment-guide/setup/about-log-management)
* [Setup Wizard](/documentation/usm-anywhere/deployment-guide/setup/setup-wizard)
6. Press **Enter**. Your sensor will now be restored.
## Step 7. Verify Connectivity and Log Ingestion
1. In **USM Anywhere**, confirm the redeployed sensor shows **Connected** status.
2. Check that events and alarms are appearing normally.
3. Verify that the sensor is forwarding logs and communicating with BlueApps and integrations as expected.
## Troubleshooting
| Issue | Cause | Resolution |
| -------------------------------------- | -------------------------------------------- | -------------------------------------------------------------------- |
| **NIC cannot be detached or attached** | VM is still running or allocated | Stop and deallocate the VM before swapping NICs |
| **IP changed unexpectedly** | NIC IP allocation is set to Dynamic | Edit the NIC IP configuration and set it to Static |
| **No data ingestion after restore** | Firewall or NSG rules blocking communication | Check port 443 outbound and confirm required endpoints are reachable |
## Related Topics
* [Redeploying a Sensor](/documentation/usm-anywhere/deployment-guide/admin/redeploy-sensor)
* [Data Sources and Log Collection](/documentation/usm-anywhere/deployment-guide/setup/about-log-management)
* [Setup Wizard](/documentation/usm-anywhere/deployment-guide/setup/setup-wizard)