| Column / Field Name | Description |
|---|---|
| Event Name | Name of the event. |
| Time Created | The date and time of the creation of the event. The displayed date depends on your computer’s time zone. |
| OTX | Indicate if it is an event or not. If the icon displays as active, click it to go to OTX. |
| Reporting Device | The asset that sent the . |
| Source Asset | Hostname or IP address of the (with the national flag if the country is known) that initiates the event. |
| Destination Asset | Hostname or IP address of the host (with the national flag if the country is known) that receives the event. |
| Sensor | Name of the USM Anywhere Sensor detecting the event. The type of sensor is also displayed below the sensor name. |
| Username | Username associated with the event. |
- Assign plugin: See Adding BlueApps to an Asset for more information.
- Full Details: See Viewing Assets Details for more information.
- Configure Asset: See Editing Assets for more information.
- Delete Asset: See Deleting the Assets for more information.
- Assign Credentials: See Managing Credentials in USM Anywhere for more information.
- : This option displays depending on the USM Anywhere Sensor associated with the asset. See Running Authenticated Asset Scans for more information.
- Scan with BlueApp: This option enables you to run an asset scan through an BlueApp. See Running Asset Scans Using a BlueApp for more information.
- Run Scan: This option displays depending on the USM Anywhere Sensor associated with the asset. See Running Asset Scans for more information.
- : This option opens the Assets Details page. The Configuration Issues tab is selected in the page. See Viewing Assets Details for more information.
- Vulnerabilities: This option opens the Assets Details page. The Vulnerabilities tab is selected in the page. See Viewing Assets Details for more information.
- Alarms: This option opens the Assets Details page. The Alarms tab is selected in the page. See Viewing Assets Details for more information.
- Events: This option opens the Assets Details page. The Events tab is selected in the page. See Viewing Assets Details for more information.
- Add to current filter: Use this option to add the asset name as a search filter. See Searching Events.
- Look up in OTX: This option searches the IP address of the source asset in the Open Threat Exchange page. See Using OTX in USM Anywhere
- Add asset to system: Use this option to create the asset in the system. See Adding Assets.
- Actions / User: Reports USM Anywhere account activity based on specific account users and summarized by Create, Read, Update, and Delete categories.
- Count / Time: Provides Reports USM Anywhere account activity based on specific account users and summarized by Create, Read, Update, and Delete categories.
- Auth / User: Reports authorization actions.
- Source Map: Provides the number of events associated with each country on a global map.
Note: You can view your bookmarked items by going to the secondary menu and clicking the  icon. This will display all of your bookmarked items and provide direct links to each of them.
Configuring Columns
Within the page, you can configure the columns and fields that display in the list view. You can also save your configuration settings for later use. To configure your columns-
From the LevelBlue Generic Data Source list view, click the
 icon.
The Manage Columns dialog box opens.
icon.
The Manage Columns dialog box opens.
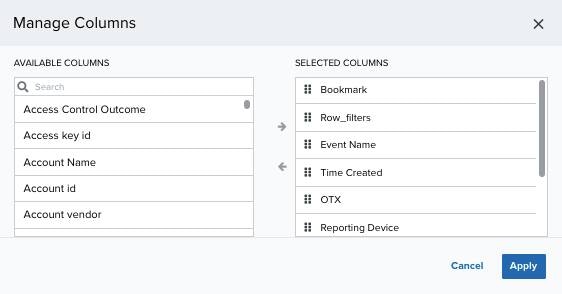
- Search the columns you want to have in the list view by using the search field.
-
Use the
 and
and  icons to select or deselect from the available columns.
- You can order the columns by clicking and dragging the column to the desired place.
- Click Apply.
Note: If you generate a report when you have set custom columns, your report keeps the columns you have configured.
Views
You can configure the view you want for the list of items in the page. To create a view configuration-
From the list view, click the icon.
-
Use the and icons to pass the items from one column to another and select the columns you want to see.
- Click Apply.
- If you want to delimit the search, select the filters you want to apply.
-
Go to Save View > Save As.
The Save Current View dialog box opens.
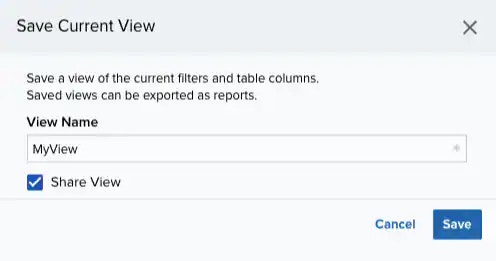
- Enter a name for the view.
- (Optional) Select Share View if you want to share your view with other users.
- Click Save. The created view is already selected.
Note: Only users in the Analyst, Manager, or Investigator roles can create a view configuration.
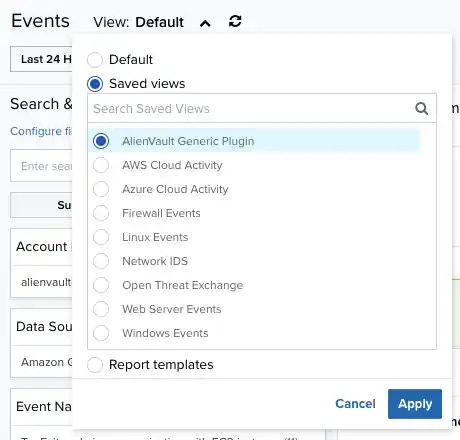
- From the ist view, click View above the filters.
-
Click Saved Views, and then select the view you want to see.
Note: A shared view includes the
 icon next to its name.
 - Click Apply.
- From the LevelBlue Generic Plugin list view, click View above the filters.
-
Click Saved Views, and then click the
 icon next to the saved view you want to delete.
A Settings Delete dialog box opens to confirm the deletion.
icon next to the saved view you want to delete.
A Settings Delete dialog box opens to confirm the deletion.
-
Click Accept.
Important: The icon does not display if the view is selected.
Note: Only Manager and Analyst users can delete any configured view. You can only delete the views you have created in an Investigator role.