| Role Availability | Read-Only | Investigator | Analyst | Manager |
Note: If a scan is suspended or otherwise running for more than two hours, it will time out. You can see the timeout result in the asset’s Scan History, as well as in the system event generated for that scan.
Enabling the Asset Scanner App
To enable the Asset Scanner App- Go to Data Sources > Sensors to open the Sensors page.
- Click the USM Anywhere Sensor for which you want to enable the asset scanner app.
-
Click the Asset Scanner tab.
Note: This item is not available on Amazon Web Services (AWS) sensors.
-
Click Enable.

Running Asset Scans from Assets
To run an asset scan from Assets- Go to Environment > Assets.
-
Complete one of these options to open the Scan Asset dialog box:
- Next to the asset name that you want to scan, click the
 icon, select Full Details, and then select Actions > Asset Scan.
 - Next to the asset name that you want to scan, click the icon, and then select Asset Scan.
- Next to the asset name that you want to scan, click the
-
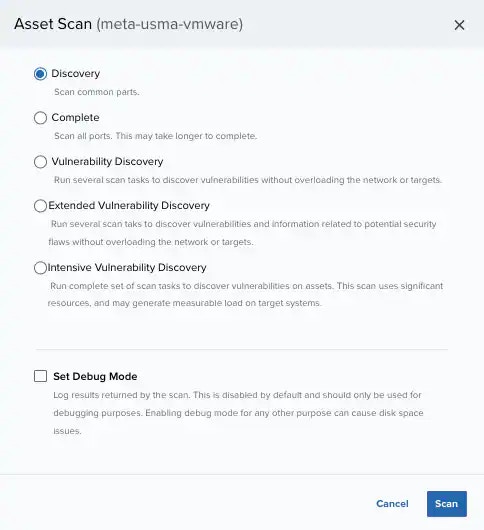
Select the scan profile that you want to run:
- Discovery: This profile scans the known ports and services searching for the most-used ports. (There are 4571 ports.)
- Complete: This profile scans all TCP and UDP ports to find the possible ports in a deployment. (There are 65535 ports.)
- Vulnerability Discovery: Performs general network discovery and checks for specific known vulnerabilities. It only reports results if they are found.
- Extended Vulnerability Discovery: Performs a Vulnerability Discovery scan, which actively discovers more about the network.
- Intensive Vulnerability Discovery: Performs several tasks to discover vulnerabilities, which uses a significant number of resources on the targeted machine. Because of this, sensitive targets may perceive a brief disruption on their services.
-
Select Set Debug Mode if you want to log the results of the scan or if you have a problem with a scan.
This option is disabled by default.
Note: The Set Debug Mode option must be used only for debugging purposes because it needs a large amount of disk space for the file or files that it generates. Only LevelBlue Technical Support should review these files. You can contact this department for more information.
- Click Scan.
- In the Asset details page, click Scan History in the table area to display the results of the scan. You can see the status of each scan and the details. USM Anywhere also creates a system event named Asset Scanner Result with the same details.
Important: Make sure the Asset Scanner app is enabled. See Enabling the Asset Scanner App for more information.
Note: See Scheduling Asset Scans from Assets and [Scheduling Asset Scans from the Job Scheduler Page]
(/documentation/usm-anywhere/user-guide/scheduler/scheduling-asset-scans-from-scheduler) for more information about how to schedule an asset scan.
Running Asset Scans When Creating a New Asset
To run an asset scan when you are creating a new asset- Go to Environment > Assets.
- Select Actions > Advanced to open the Create New Asset dialog box. See Adding Assets in the UI for more information.
-
The Scan the newly added asset for asset details field is selected by default. Use it for scanning the newly added asset.
Important: The Asset Scan options are available only for the VMware Sensor and Hyper-V Sensor. USM Anywhere uses the Discovery profile to conduct the scans.

- Click Save. A message displays at the top of the page to inform you that the scan has been launched and is running. When the scan is complete, the results are visible in the tab Scan History of the asset details page. See Viewing Assets Details for more information.