| Role Availability | Read-Only | Investigator | Analyst | Manager |
- Asset Discovery
- Adding Assets by Using the Setup Wizard
- Adding Assets in the UI
- Adding Assets Through a CSV File
Asset Discovery
USM Anywhere discovers assets automatically if you have a provider (for example, Amazon Web Services [] or ) or a management API (for example, VMware ESX). After deploying the and applying the API credentials, USM Anywhere discovers assets in these environments. See Running an Asset Discovery for more information.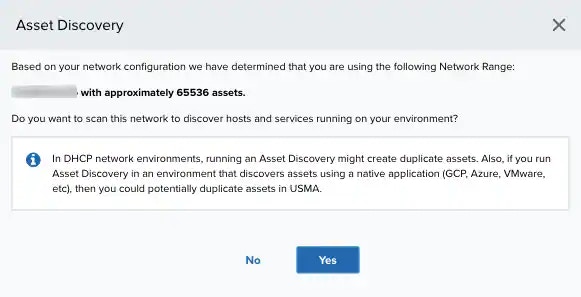
Note: Assets discovered automatically may occasionally be labeled “inactive”. This label reflects the asset’s state in your environment according to your provider. Please see your provider’s documentation for an explanation of how they define and detect asset inactivity.Assets added through other means are always labeled “active”.
Note: Asset discovery scans can generate assets for hosts that do not exist when traversing certain network devices. See the Asset Discovery creates an Asset for each IP address in a network range article for more information.
Important: Make sure when you use a virtual private network (VPN) using a Cisco Firewall, that arp-proxy is enabled in the . Otherwise, all the assets will be reported using the same media access control (MAC) address, and USM Anywhere will consider all of them to be different interfaces for the same asset.
Adding Assets by Using the Setup Wizard
The Setup Wizard is available on USM Anywhere when the sensor is not configured and is displayed after each . This wizard includes the initial tasks for getting USM Anywhere ready for . As a result, the wizard collects as much data as possible to analyze and identify threats in your environment. There are two ways to add assets to scan when using the Setup Wizard: by adding individual assets, or by using network ranges to add multiple assets.Adding Individual Assets to Scans
The asset discovery option in the Setup Wizard enables you to add individual assets to scans. To add individual assets using the Setup Wizard- Inside the Setup Wizard, click Asset Discovery.
-
Enter an asset name and either an IP address, or a fully qualified domain name (FQDN).
- Click Save.
Adding Multiple Assets to Scans Using a Network Range
The asset discovery option in the Setup Wizard enables you to add multiple assets in a network range to scans. To add multiple assets in a network range using the Setup Wizard- Inside the Setup Wizard, click Asset Discovery.
-
Click Scan Networks.

-
Enter a network name and a Classless Inter-Domain Routing () block to specify the subnet’s IP address block that you want to scan.

- If you have more than one sensor configured in your environment, you need to select a sensor. By default, the Scan this network daily to discover new assets and services checkbox is selected. This option configures daily network discovery assets when scanning a network from the wizard.
- Click Scan. The length of this process depends on the length of the network range (for example, longer network ranges have longer processes). After the process finishes and the scan is completed, the number of assets found is displayed. These assets are automatically added to USM Anywhere. In addition, a dynamic is automatically created with these assets.
- Click Scan Another to start a new scan, or click Next to continue with the following screen.
- Go to Data Sources > Sensors.
- Click the USM Anywhere Sensor with which you want to scan the network.
- Click Asset Discovery.
-
Click Yes to scan the network.
This step may be different depending on the sensor you have installed.
After the process finishes and the scan completes, you can see the number of assets found. These assets are automatically added to USM Anywhere. In addition, a dynamic asset group is automatically created with these assets.Note: This option is not available for AWS Sensors because the instances are automatically set.
- Click Scan Another to start a new scan or click Next to continue with the following screen.
Adding Assets in the UI
Adding assets in the user interface (UI) enables you to manually add an asset. To do this, you must know the IP addresses of the assets. There are two methods of manually adding assets through the UI:- The quick method, by adding the asset name and either an IP Address or FQDN, and then selecting a USM Anywhere Sensor.
- The advanced method, which requires more data related to the asset that you are adding.
- Go to Environment > Assets.
-
In the upper right side of the page, select Actions > Quick to display the following fields above the asset list:

-
Enter the asset name and either the IP address or FQDN in the text boxes displayed above the asset list.
Use the
 icon to display the rules that must satisfy a valid FQDN.
- If you have more than one USM Anywhere Sensor connected, select the sensor from the drop-down menu. By default ,the Scan the newly added asset for asset details checkbox is selected. This option scans the newly added asset and displays depending on your sensor. See Running Asset Scans When Creating a New Asset for more information.
- Click Save.
- Go to Environment > Assets.
-
In the upper-right side of the page, select Actions > Advanced.

-
Enter the information in each field.
Add the data of the fields that need to be added, as described in the following table.
Fields in the Create New Asset window
Field Meaning Name Name that identifies the asset. Description A short description of the asset. Sensor Select the sensor you want to associate with the asset. Logo Symbol that represents the asset. Asset Type (Optional) Device type that identifies the asset. Select an option from the list. See USM Accepted Asset Types for more information. Time Zone Time zone configured for your USM Anywhere instance (default is Coordinated Universal Time [UTC]). Prevent Remote Scanning Select this field to avoid remote scanning. This option displays depending on your deployed sensor. Scan the newly added asset for asset detail By default, this field is selected. Use it to scan the new added asset. See Running Asset Scans When Creating a New Asset for more info. Compliance Scope To include the asset in the Payment Card Industry Data Security Standards (PCI DSS) asset group, the Health Insurance Portability and Accountability Act (HIPAA) asset group, or both, select the corresponding checkboxes. See Using USM Anywhere for PCI Compliance and USM Anywhere Compliance Templates for more information. Owner (Optional) Free text field to add an owner of the asset. Network Interfaces IP address assigned to the asset.
. MAC Address assigned to the asset.
FQDN. Fully Qualified Domain Name.Important: You must enter at least one of the three fields in Network Interfaces. These fields are highlighted when the values are not valid.Note: Every hour, USM Anywhere refreshes information about the PCI DSS or HIPAA asset groups. If you select the Compliance Scope field, you can see the asset inside the asset group after the following update. - Click Save.
Adding Assets Through a CSV File
USM Anywhere enables you to add assets through a CSV file. This option adds assets in large quantities to your environment. See Importing Assets from a CSV File for more information. To add assets through a CSV file- Go to Environment > Assets.
-
Select Actions > Import Assets.
The import assets dialog box opens.
- Drop your CSV file or select the file from your desktop.
- elect a sensor if you have more than one sensor configured in your environment.
- Click Import.