| Role Availability | Read-Only | Investigator | Analyst | Manager |
- Go to Data Sources > BlueApps > Available Apps.
- Locate the integration.
-
Click the
 icon next to Data Sources Details.
-
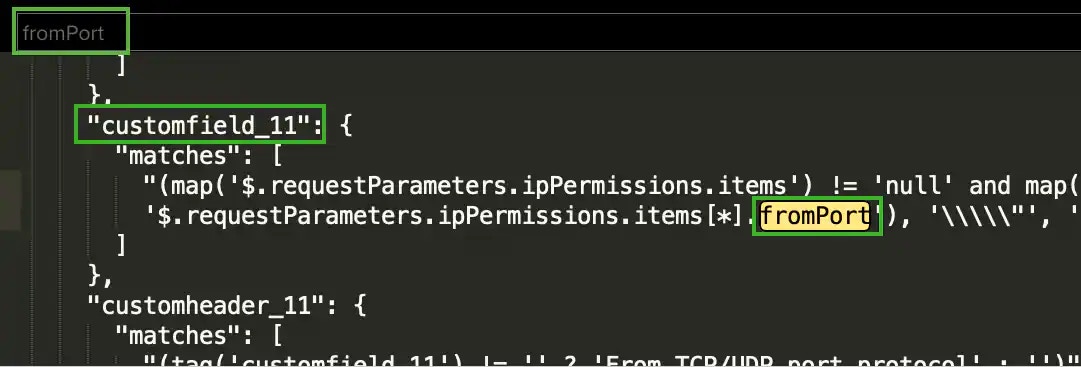
Search the property key inside the text box and copy the property value that maps with that property key.
Note: In this example the field is “customfield_11“. This is only for this integration; the same field from another integration may be mapped to another field.
- Go to Settings > Rules.
- Select Create Orchestration Rule > Notification Rule.
- Select a Boolean operator. The options are AND, OR, AND NOT, and OR NOT.
-
Select a packet type in the Match drop-down list.
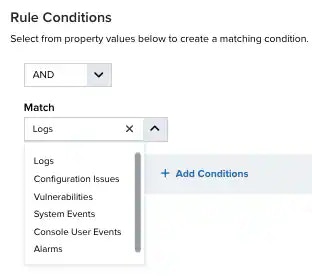
- Logs: Use this packet type for event-based rules.
- Configuration Issues: Use this packet type for configuration issues-based rules.
- Vulnerabilities: Use this packet type for vulnerabilities-based rules.
- System Events: Use this packet type for system events-based rules.
- Console User Events: Use this packet type for console user events-based rules.
- Alarms: Use this packet type for console user alarms-based rules.
- Click Add Conditions and paste the property value.
-
Choose an operator and enter the value.
 Note: The fields found in the integration code may be different from the fields used in the rule conditions. In the example, “customfield_11” is actually the “Custom Field 11” in rule conditions.
 -
(Optional.) Click Add Group to group your conditions.
Note: See Operators in the Orchestration Rules for more information.
- In the Occurrences text box, enter the number of event occurrences that you want to produce a match on the conditional expression to trigger the rule. You can enter the number of occurrences or use the arrows to scroll the value up or down. You can enter a number between 1 and 100.
-
Click Next.
- Enter a name for the rule.
- (Optional.) Enter a description for identifying this rule.
-
Select a notification method:
- Amazon SNS: This method requires the setup of the Amazon Simple Notification Service (SNS) API call from the USM Anywhere server. There is no limit to the number of Amazon SNS endpoint notifications sent. However, this method requires having an Amazon Web Services (AWS) account for setup and use. The Amazon SNS allows the first 1000 email notifications per month to fall into the free messaging tier. See Sending Notifications Through Amazon SNS for more information.
- Datadog: This method requires the creation of a Datadog API key and additional steps. See Sending USM Anywhere Notifications to Datadog for more information.
- Email: This method sends the notification by email. You need to enter information for the email subject and enter a destination email address. Multiple comma-separated email addresses are possible. This method uses a built-in integration with the Amazon Simple Email Service (SES) function and is limited to a maximum of 200 emails per rolling 24-hour period. The only user-customizable information available is the email subject line.
Select the Sanitize Email Content checkbox to replace detailed email contents with a generic message and a link that requires user authentication to view further information.Note: The rolling 24-hour, 200-email limit refers to all email accounts. For example, you can have a rule with multiple emails, which counts as a single email delivery. Alternately, if you have several rules with several emails, each of these counts as an individual email account. Sensor-disconnect emails do not count against this number because they are critical and are only sent to users whose role is manager.- PagerDuty: This method is performed using an integration in the product, and user setup is required. See Sending USM Anywhere Notifications to PagerDuty for more information.
- Slack: This method makes use of a user-created Slack Webhook integration. Slack integration can also be performed using Amazon SNS. See Sending USM Anywhere Notifications to Slack for more information.
-
In the Length text box, specify the timespan that you want to use to identify a match for multiple occurrences. Enter the number in the text box, and then use the drop-down menu to select a value of seconds, minutes, or hours.
This duration identifies the amount of time that transpires from the beginning to the end of the occurrence. If the number of occurrences is not met within this period, the rule is not a match.
Note: Your defined length and occurrences function together to specify the number of occurrences within a time period that will produce a match for the rule. For example, you can define a rule to trigger an for an attempt when a failed occurs three times within a five-minute window.
- Click Save. The created rule displays in the list of rules. You can see it from Settings > Rules. See Orchestration Rules for more information.
- Go to Environment > Assets.
- Locate the asset that has the integration assigned.
-
Next to the asset name, click the
 icon and select Full Details.
-
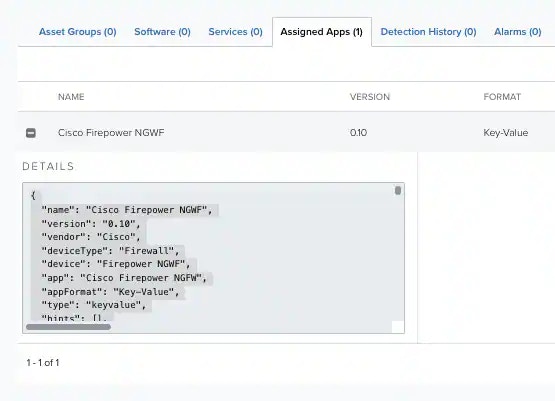
Click the Assigned Apps tab.

-
Click the icon next to Data Sources Details.
-
Copy all the text under the Data pane.
-
Search the property key inside the copied text and copy the property value that maps with that property key. For example, search the property key fromPort. This property key maps with customfield_11.
Note: In this example the field is “customfield_11“. This is only for this integration; the same field from another integration may be mapped to another field.
- Go to Settings > Rules.
- Click Create Orchestration Rule > Notification Rules. See Notification Rules from the Orchestration Rules Page for more information.
- Select a Boolean operator. The options are AND, OR, AND NOT, and OR NOT.
-
Select a packet type in the Match drop-down list.
- Logs: Use this packet type for event-based rules.
- Configuration Issues: Use this packet type for configuration issues-based rules.
- Vulnerabilities: Use this packet type for vulnerabilities-based rules.
- System Events: Use this packet type for system events-based rules.
- Console User Events: Use this packet type for console user events-based rules.
- Alarms: Use this packet type for console user alarms-based rules.
- Click Add Condition and paste the property value.
-
Choose an operator and enter the value.
Note: The fields found in the integration code may be different from the used in the rule conditions. In the example, “customfield_11“ is actually the “Custom Field 11“ in rule conditions.
-
Click Next.
- Enter a name for the rule.
- (Optional.) Enter a description for identifying this rule.
-
Select a notification method:
- Amazon SNS: This method requires the setup of the Amazon Simple Notification Service (SNS) API call from the USM Anywhere server. There is no limit to the number of Amazon SNS endpoint notifications sent. However, this method requires having an Amazon Web Services (AWS) account for setup and use. The Amazon SNS allows the first 1000 email notifications per month to fall into the free messaging tier. See Sending Notifications Through Amazon SNS for more information.
- Datadog: This method requires the creation of a Datadog API key and additional steps. See Sending USM Anywhere Notifications to Datadog for more information.
- Email: This method sends the notification by email. You need to enter information for the email subject and enter a destination email address. Multiple comma-separated email addresses are possible. This method uses a built-in integration with the Amazon Simple Email Service (SES) function and is limited to a maximum of 200 emails per rolling 24-hour period. The only user-customizable information available is the email subject line.
Select the Sanitize Email Content checkbox to replace detailed email contents with a generic message and a link that requires user authentication to view further information.Note: The rolling 24-hour, 200-email limit refers to all email accounts. For example, you can have a rule with multiple emails, which counts as a single email delivery. Alternately, if you have several rules with several emails, each of these counts as an individual email account. Sensor-disconnect emails do not count against this number because they are critical and are only sent to users whose role is manager.- PagerDuty: This method is performed using an integration in the product, and user setup is required. See Sending USM Anywhere Notifications to PagerDuty for more information.
- Slack: This method makes use of a user-created Slack Webhook integration. Slack integration can also be performed using Amazon SNS. See Sending USM Anywhere Notifications to Slack for more information.
-
In the Length text box, specify the timespan that you want to use to identify a match for multiple occurrences. Enter the number in the text box, and then use the drop-down menu to select a value of seconds, minutes, or hours.
This duration identifies the amount of time that transpires from the beginning to the end of the occurrence. If the number of occurrences is not met within this period, the rule is not a match.
Note: Your defined length and occurrences function together to specify the number of occurrences within a time period that will produce a match for the rule. For example, you can define a rule to trigger an for an attempt when a failed occurs three times within a five-minute window.
- Click Save. The created rule displays in the list of rules. You can see it from Settings > Rules. See Orchestration Rules for more information.