| Role Availability | Read-Only | Investigator | Analyst | Manager |
- From the detail of an alarm or event, select the create rule option.
- From the orchestration rules page, select the rule you want to create.
- Go to Activity > Alarms or Activity > Events.
- Locate the alarms or events you want to include in the rule.
- Click an alarm or event to see its details.
-
Click Create Rule:
- If you are displaying an alarm, you can choose between a suppression or a notification rule.
- If you are displaying an event, you can choose between an alarm, filtering, notification, or suppression rule.
- Select a Boolean operator. The options are AND, OR, AND NOT, and OR NOT.
- Select a packet type in the Match drop-down list. The options vary depending on the selected rule.
-
You have already suggested property values to create a matching condition, but you can add new property values by clicking Add Condition.
Note: Less common parameters will appear as paired Custom Header N and Custom Field N rows with the parameter’s name and value. N represents the number that is automatically given to the parameter.Note: If the field is related to the name of a country, you should use the country code defined by the ISO 3166.Note: The Sources or Destinations field needs to match the universally unique identifier (UUID) of the event or alarm. You can use the Source Name or Destination Name field instead.Note: If you need to add a property value that maps with a property key, you need to know the mapping of the field. See Determining the Mapping of a Field for more information.
-
(Optional.) Click Add Group to group your conditions.
Note: See Operators in the Orchestration Rules for more information.
-
In the Occurrences text box, enter the number of event occurrences that you want to produce a match on the conditional expression to trigger the rule.
You can enter the number of occurrences or use the arrows to scroll the value up or down. You can enter a number between 1 and 100.
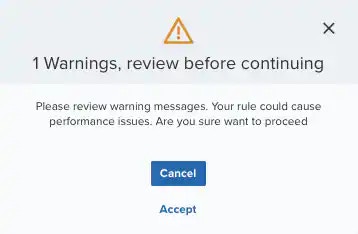
Note: The current rule box shows you the syntax of your rule, and the rule verification box reviews that syntax before saving the rule.
-
Click Next.
- Enter a name for the rule.
- (Optional.) Enter a description for identifying this rule.
- Depending on the selected rule, fill in the different fields.
-
In the Length text box, specify the timespan that you want to use to identify a match for multiple occurrences. Enter the number in the text box, and then use the drop-down menu to select a value of seconds, minutes, or hours.
This duration identifies the amount of time that transpires from the beginning to the end of the occurrence. If the number of occurrences is not met within this period, the rule is not a match.
Note: Your defined length and occurrences function together to specify the number of occurrences within a time period that will produce a match for the rule. For example, you can define a rule to trigger an for an attempt when a failed occurs three times within a five-minute window.
-
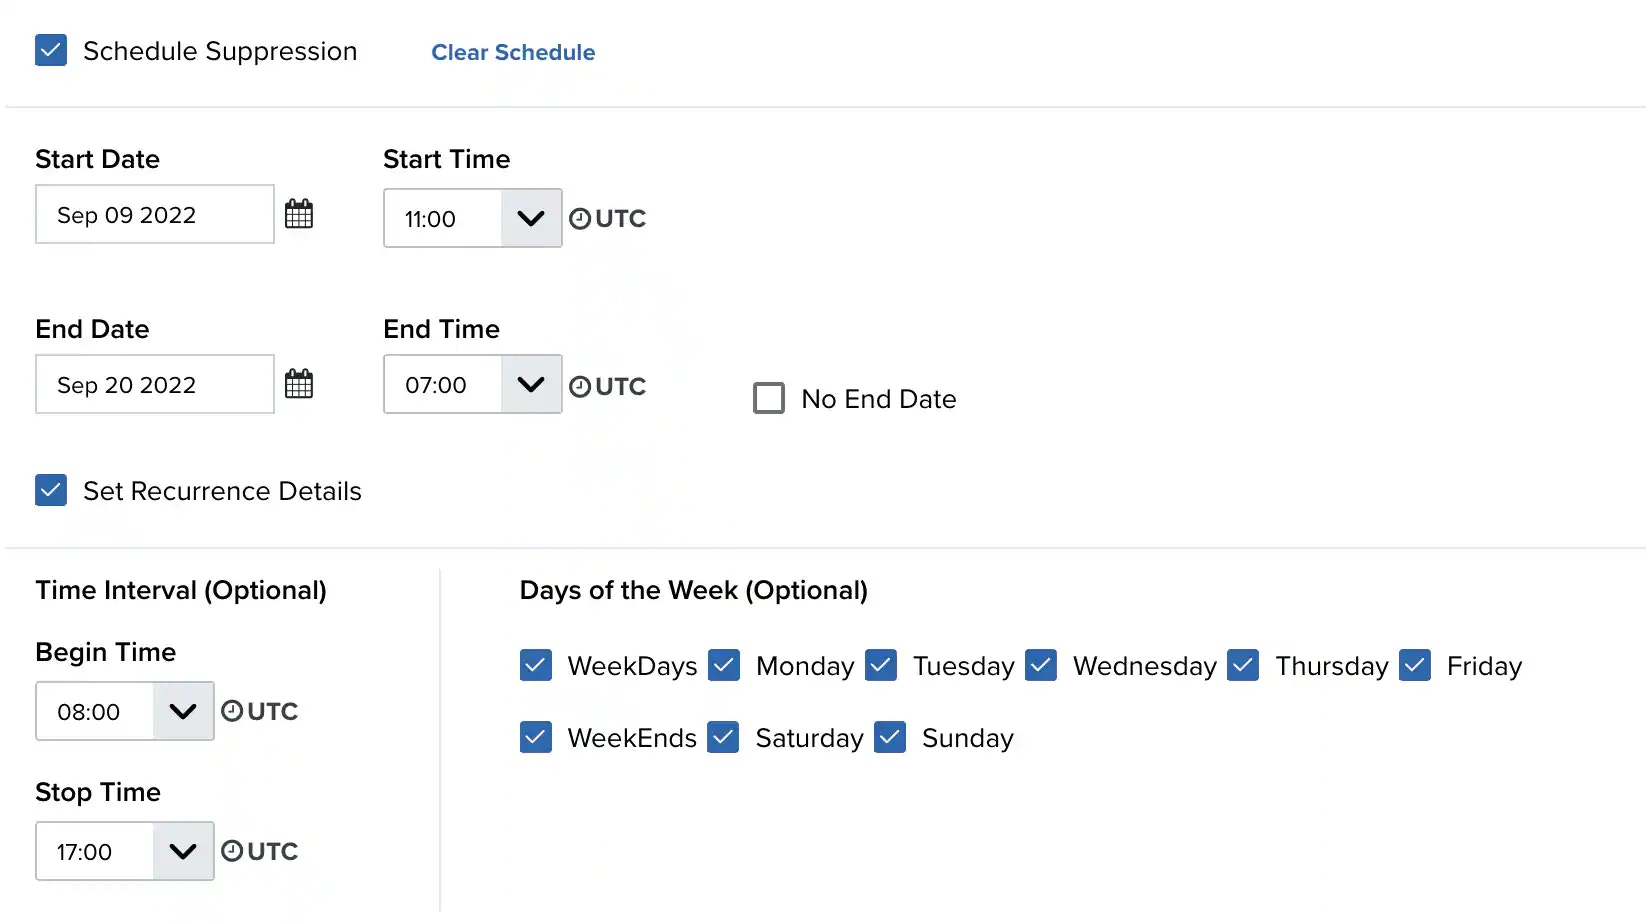
(Optional.) Click the box labeled Schedule Rule to configure a schedule within which this rule will apply. Modify these two options:
- Start Date and Time: Specify the date and time at which this rule will begin applying.
- End Date and Time: Specify the date and time at which this rule will stop applying.
-
(Optional.) If you choose to configure a schedule for this rule, you can also set it to recur on a configured schedule. Click the box labeled Set Recurrence Details to configure when and how frequently or on which days this new rule will apply.
- Click Save. The created rule displays in the list of rules. You can see it from Settings > Rules. See Orchestration Rules for more information.
-
Go to Settings > Rules and select the rule you want to create:
- Suppression Rule (see Suppression Rules from the Orchestration Rules Page for more information)
- Filtering Rule (see Filtering Rules from the Orchestration Rules Page for more information)
- Alarm Rule (see Alarm Rules from the Orchestration Rules Page for more information)
- Notification Rule (see Notification Rules from the Orchestration Rules Page for more information)
- Response Action Rule (see Response Action Rules from the Orchestration Rules Page for more information)
- Select a Boolean operator. The options are AND, OR, AND NOT, and OR NOT.
- Select a packet type in the Match drop-down list. The options vary depending on the selected rule.
-
Click Add Conditions and select the property values you want to include in the rule to create a matching condition.
Note: If the field is related to the name of a country, you should use the country code defined by the ISO 3166.Note: The Sources or Destinations field needs to match the universally unique identifier (UUID) of the event or alarm. You can use the Source Name or Destination Name field instead.Note: If you need to add a property value that maps with a property key, you need to know the mapping of the field. See Determining the Mapping of a Field for more information.
-
(Optional.) Click Add Group to group your conditions.
Note: See Operators in the Orchestration Rules for more information.
-
In the Occurrences text box, enter the number of event occurrences that you want to produce a match on the conditional expression to trigger the rule.
You can enter the number of occurrences or use the arrows to scroll the value up or down. You can enter a number between 1 and 100.
Note: The current rule box shows you the syntax of your rule, and the rule verification box reviews that syntax before saving the rule.
-
Click Next.
- Enter a name for the rule.
- (Optional.) Enter a description for identifying this rule.
- Depending on the selected rule, you should fill in different fields.
- In the Length text box, specify the timespan that you want to use to identify a match for multiple occurrences. Enter the number in the text box, and then use the drop-down menu to select a value of seconds, minutes, or hours.
Note: Your defined length and occurrences function together to specify the number of occurrences within a time period that will produce a match for the rule. For example, you can define a rule to trigger an for an attempt when a failed occurs three times within a five-minute window.
-
(Optional.) Click the box labeled Schedule Rule to configure a schedule within which this rule will apply. Modify these two options:
- Start Date and Time: Specify the date and time at which this rule will begin applying.
- End Date and Time: Specify the date and time at which this rule will stop applying.
-
(Optional.) If you choose to configure a schedule for this rule, you can also set it to recur on a configured schedule. Click the box labeled Set Recurrence Details to configure when and how frequently or on which days this new rule will apply.
- Click Save. The created rule displays in the list of rules. You can see it from Settings > Rules. See Orchestration Rules for more information.